Български
  Čeština
  Dansk
Dansk  Deutsch
  Eesti
Eesti  Español
  Français
  Ελληνικα
  Hrvatski
  Italiano
  Latviešu
  Lietuviškai
  Magyar
  Nederlands
  Norsk bokmål
  Polski
  Română
  Русский
  Slovenčina
  Slovenščina
  简体中文
简体中文  Tagalog
  Tiếng Việt
  العربية
  Português
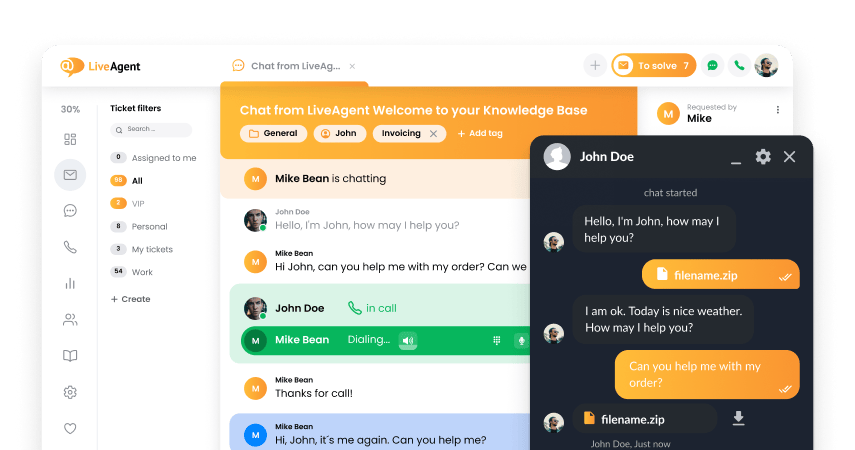
 LiveAgent Webinar 2: Email, Automation, SLA
Learn about SLA automation rules, email organization, and tools to automate your workflow in this LiveAgent Webinar on email, automation, and SLA.

LiveAgent Webinar 2: Email, Automation, SLA
Topics
- SLA automation rules
- email account connection and organization into departments
- multi-brand support and business hours
Video summary
The video discusses SLA automation rules, tools to automate workflow, and keeping email tickets organized. The speaker demonstrates how to connect email accounts and organize them into departments with agents assigned to each department. The speaker also touches on multi-brand support, business hours, ticket tagging, and automation.
Video transcript
all right it's all right good morning
everyone this is John Gordon with live
agent can you guys hear me okay go ahead
and write in the chat if you guys have
any questions I'm gonna be checking the
chat during the webinar okay so you guys
can hear me sounds good
perfect perfect London here is you we've
got someone from London Brad sure from
London okay great great guys so yeah
yeah let's go ahead and get started then
so today's webinar we are going to be
going over SLA automation rules things
like that so basically you know tools to
automate your your workflow make things
easier for you and basically stay on top
of your tickets so that's the main focus
we want it's gonna be focusing on mainly
the ticket section not too much chat or
call tickets but mainly you can be
focusing on email tickets and automation
for those processes keeping them
organized and things like that so yes
it's going to be recorded as well and
I'm gonna send out a link to this you
know after it's over to you guys so you
guys can review it with your colleagues
as well so yes we got a lot of people
here today awesome so like I said we're
gonna be going over automation so I want
to focus on the ticketing section a lot
of you guys are from the app store deal
you just signed up for live agent so
we're gonna be going over basically how
to set up your emails set up departments
set up some email templates I'm gonna
touch a little bit on multi brand
support as well like how we could set
that up and then also SLA levels SLA
rules how we can set up like business
hours and also ticket tagging and
automation in that area as well so
let's go ahead and jump on and then so
let's see what we got here okay so you
guys can see my screen here so let's go
straight into how we can get set up on
the emails section of live agents so
basically this is the first thing we
would recommend when you sign up for
live agent or when you get started with
your account is basically to set up your
you know connect your business emails to
live agents so let me just show you guys
really quickly how you can do that it's
pretty simple hold on a second we
actually have a question here how'd you
get email notifications how to get rid
of force tickets okay I'll go over all
these questions as well Thank You Brad
and William yeah yeah let me go over
those questions yeah guys if you have
any questions feel free to write them
into the chat at any time as well so
let's get started with actually how to
connect and get your emails going first
of all
so we're going to go here to our
configuration section here and you're
gonna see at the top we have emails and
we have mail accounts now from here you
can connect all of your business emails
you want you can connect as many as you
want there's there's no limitation here
so we're going to just go ahead and go
to add email account right here
now it's pretty straightforward
basically if you've using like Gmail or
office 365 you're just gonna you're just
gonna click on this type in the email
password and that's basically it you're
gonna hit connect now there's a few
other options here we're also going to
choose what Department this email
account goes to and basically
departments and live agents are going to
be how you organize your tickets so
basically like each department can be a
different section in your live agent
account so this is really useful for
first of all if you're doing multi brand
if you have multiple websites we would
recommend you know using different
websites different departments for
different websites so I'll go over that
in a minute as well so you're gonna
you're gonna choose your department
right here which email which department
this email at tena koe tu
so for example we can choose like brand
a now also when you're connecting one up
an email like this you're gonna see
fetch all emails from mailbox so this
means if you have this checked it's
gonna actually fetch all of the old
emails from this mailbox if you leave
this blank like this it's only gonna
fetch new emails to the inbox so if you
want to start fresh just leave it
unchecked but if you want to get
everything from this inbox you can check
this box and hit save and now it's gonna
bring in all of those emails so once we
hit save it's gonna connect the email
and now it is connected now you'll be
able to see the ones that are connected
are gonna have the you know green check
here if they are deactivated or
something is wrong you're gonna see you
know a little notification here
Microsoft Exchange if you want to
connect a Microsoft Exchange you're
gonna just do other here and then you're
gonna set it up by IMAP or pop3 hit
connect and you're gonna need to type in
all the server credentials here so
you're gonna be able to get this from
from actually from exchange they should
be able to provide this to you and you
will hit connect just like that
basically if you don't see your email
account here you can just hit other and
connect any other mail service so once
you have it connected here and it's free
and you're good to go every single email
coming and now is gonna be created as a
ticket for you so you'll be able to see
tickets coming into your ticket list
here so if we go to our tickets next
when we go to all tickets this is your
universal inbox right here this is going
to show you every single ticket every
single email coming in to your email
accounts connected so this will be your
Universal inbox here now what we
recommend you do next once you have your
email is connected we want to actually
organize these tickets right so this is
where exactly where departments come
into place we're gonna go here and let's
set up some departments now so like I
said earlier departments basically are a
way for you to organize your tickets
these are really deeply integrated into
live agent the departments are going to
be useful for doing things like
SLA automation running reports
everything is connected to departments
so departments are like the top of the
tree where are you organizing your
tickets so you can connect I mean you
can create as many as you want from here
so you can see this is my you know my
trial account here this is just like a
hem for test purposes you're gonna see
we have a lot of departments created
here so when you start up you're not
gonna have any so we need to create at
least one department to get started but
of course I would recommend you create
you know a few different ones to
organize your tickets so a few examples
are a lot of companies have like you
know a sales department and then maybe
they have like a technical departments
so you can get started creating it like
that but if you had like let's say brand
a or Grandby websites you know if you
have multiple web sites multiple brands
you could create a department for each
brand as well so it's up to you so let's
say we just want to create like sales
departments so we hit create now it is
ready to go and now we can add agents to
this department so basically in live
agent there are two different roles
there are agents and admins in the
system now admins have access to all
departments they have access to settings
and reporting now the agents they only
have access to departments that you put
them in actually so when you're going to
go to this department here once you've
created it and you go to the agents you
can add the agency want into this
department so let's say we want to add
what's that David and Jane and let's add
me as well because on the account owner
now now Jane will be able to see tickets
in this sales department so let's hit
save here so the other agent we have
Vince he's not gonna be able to see
these tickets because he's not in the
department so your agents you can
separate them by department and they'll
only be able to see those tickets in
those departments they'll only be able
to access those you know chats in those
departments and even phone calls as well
so now we have the agents added in the
department now we can take it one step
further as well and we can even allow
the agents to have access to tickets and
chats or calls in this department so
you're gonna see now we have access for
tickets for these agents as well so
let's say we want Jane to do you know
tickets but we don't want her to do
maybe chats in the sales department so
we can just turn her off for chats we
don't want her to do calls either so
let's - yes here we have to confirm it
and hit save so now she's in this
department but she can only solve
tickets in this department so she can't
do chats or calls ok and now the last
section we have here is the email
templates so from the email templates
this is where you can actually configure
different templates for this department
so if you're replying to a customer in
your sales department it's going to load
this email template right here so you
can see here ticket reply let's say for
example so this is our email template
for this department when replying to a
ticket so you can put your own you know
HTML code here this is an HTML you'll
see there's HTML section you can put
your own images whatever you want so for
this sales department it's gonna load
this email template maybe you wanted to
say something different from when your
maybe you know your technical department
you're gonna have like you know
sincerely here but maybe for sales you
wanted to be a little more friendly sir
just gonna put like kind regards for the
signature so something like that you can
you know customize in the email
templates and now for multi brand this
works exactly the same way so you know
for your brand a maybe you have a
different logo down at the bottom or a
different website down at the bottom you
know for this maybe this is like our
live agent in a department so I'm gonna
put live agent down here so for each of
your brands you can have the different
email template as well now a few other
things in the email template you're
gonna see here you could choose which
name you wanted to be from this is gonna
be like the agent name so even if you're
using a shared you know email box like
support at live agent comm you can
choose if you wanted to show the agents
name or if you just want it to be from
just say it from live agents use that as
well so it's up to you you can customize
the subject here as well and then once
you're actually customizing the email
templates we have options for adding
some variables so you could add like you
know day
time first name of the contact you know
his address any of his custom fields you
can add here as well so you're gonna see
you over on the right these are your
variables you can use so if you want to
add a variable let's say you want to add
like for example
ticket ID just click it and it's gonna
add it right there so now when you're
replying this is going to turn into the
actual ticket ID for the customer
then we have a few options to include
Claude quoted text at the bottom here so
you know this is like when you're
replying if you wanted to quote the last
message last couple of messages or no
quote you can save that as well
okay so let's hit save and now that's
good to go
we can close this out so you can do that
for each of your templates here and
remember this is just for this
department so you can do this for each
of your different departments as well
let's see here we have a question how
can we assign a specific time zone to an
agent once a support ticket has reach a
department
to an agent for instance portuguese
reach the department it's not possible
to set a time zone for an agent actually
there's no time zone settings here it's
gonna use the times don't automatically
have your computer for timestamps and
things like that so okay so now we got
these email templates set up so unless
you at the top here also mail account
and this is going to be used just for
email notifications for this department
so you can choose which mail account you
want to send notifications to this
department and hit it right there okay
so now we're done we can hit save now
okay so now let's say we have some of
our departments set up so now tickets
are going to be organized by department
we got the email template set up for
each department as well now you can also
customize your email templates from here
you're gonna see email and customer
templates so if you want to actually
just set a global email template you
don't need to actually set it for each
department individually you can just do
it from here just put a customer
templates and you can actually set a
global template so for ticket replies
can hit edit right here and this is
going to be a global template for all of
your ticket replies so you can set it
right here now if you want it just for a
specific department you're gonna see
Department templates so you're gonna see
oh whoops link closes help you're gonna
see if you have it for a department
template you're gonna see it right here
so we have one for sales you can edit it
here if you want to add a different
department template you can do so right
here just click this button and we can
choose the department so let's say now
we want to set up a template
specifically for like our technical
department and now we can modify this
for a technical department hit save and
just like that now you're gonna see we
have Department template for sales and
technical now all of our other
departments are just going to use this
general template here
the department specific ones are going
to use these two here now this applies
for all of the templates as well so we
have we did one for reply we also have
options for when you create a new ticket
so that is going to be right when you
click up here new and you do a new
ticket it's going to load this new
ticket template here just close this out
let me go back to our settings here so
we got it for new ticket
also when you're forwarding emails we
have a template for that and ticket
resolved template
now this ticket resolved template this
is gonna be
whenever you resolve a ticket there's an
option to automatically send an email to
the client if you want to turn this off
you can just switch this off right here
and now it's not going to automatically
send a resolved notification so you're
gonna see resolve notification just loud
but if you want to actually enable it
let's click here so every time you
resolve a ticket or the case to closed
it's gonna send out this email template
right here so you can edit it right here
you know you can see we have a little
example here like hello you know your
ticket what the ID has been resolved and
there's some options here so this is the
default email and you can edit this
however you want
now we have a few other ones chat
transcripts you know for god password
these are all for the customer if
they're trying to log into your you know
knowledgebase
chat transcript is of course when they
request a transcript from a chat you can
edit that template here as well okay so
can I add my own question for an agent
for example if Q comes in from LinkedIn
or Instagram I'd like to add it for
someone to see it and answer to me
you
if I'm not sure what you mean exactly if
I'm a comment for an agent someone to
see it actually I'm not quite sure what
you mean by that one Jennifer but maybe
I can cover that in a little bit but I'm
not quite sure what you mean by that
if a question comes in from LinkedIn or
Instagram like someone to see it and
answer to me we do have the option you
could create a department specifically
for you no emails coming to your
Instagram or LinkedIn email and then you
can add the agents to that specific
department
yeah definitely so I'd like to be able
to answer Instagram messages and we
don't have any Instagram integration so
collect and post here to certain agents
yeah definitely so you could create an
Instagram Department add the agency want
to that Department to be able to answer
those questions and then you know if you
have like a forward those questions into
your email or something like that then
the agents can answer them in that
department so yeah you would use
departments for that
okay so now we've covered the email
templates we also have a customer we
have which covered the customer
templates we also have agent templates
these are for you know when agents
forget a password something like that
these are all the emails sent to your
actual agents not to your clients you
can edit these here as well okay so we
got all those set up now
let's go over the next important thing
so after you have your emails connected
and you've got departments set up the
next thing you're gonna need is SLA
levels so service level agreements and
these are pretty much key to organizing
staying on top of your tickets knowing
what tickets need to be answered next so
these are very very crucial so you're
gonna see down here in automation the
automation section is where you're going
to handle all the automated tests like
SLA levels rules predefined answers tags
all of that's gonna be handled here so
let's go to SLA now you can see I've got
a lot of SLA set up already but when you
first go here you're not gonna have any
so first we need to create an SLA rule
now the purpose of this is so that when
the ticket comes into your live agent
like an email you want to respond to
them in order when they come in so you
know when someone let's say like David
sends us an email and then you know 20
minutes later John sends us an email you
need an SLA level to tell you that
David's David's you know email needs to
be responded to first because this came
in first so we need to answer his next
now you can set SLA levels to countdown
base for the ticket for you so let's say
we want to respond to all of our emails
within one hour so let's just do our one
hour
SLA we're gonna set here first answer
first response let's do one hour here so
we can set one hour for our first answer
so this means all tickets
with this SLA level need to be responded
to within one hour then we also have
options for first assigned so basically
what this means is the time isn't going
to start until it's actually assigned to
an agent so if you have to get come in
and then you know 30 minutes later you
assign it to one of your agents then
this countdown will start so if you want
to add a first assign you can do that as
well
so let's must leave it at first answer
and then maybe our second answer we can
do a little bit more time like an hour
and 30 minutes okay so that's fine for
the next answer let's just leave these
chat call answer blank we're just doing
it for tickets right now now now this is
a pretty general one our SLA but what if
you you know you get like a ticket at
like 2:00 in the morning or something
like that you don't want the actual SLA
to start until you know you get into the
office at 9:00 a.m. so we can use
business hours to actually define the
times we want so from right here you're
gonna see business hours settings so
let's set up our business hours and
let's do first of all let's set up the
time zone let's just to US Central Time
and we want our business hours let's
just do Monday to Friday let's just do
9:00 to 5:00 keep it classic here
so we're gonna do 9:00 to 5:00 and it's
gonna be like this because there's no
a.m. at p.m. it's like the military time
here so let's to 17 hours on each one
okay so we've got nine to five Monday to
Friday student on here okay there we go
five and we can also add holidays if we
once you know we could add dates there
but let's just leave it nine to five for
now okay it's saved so now this one hour
so if you get a ticket at you know seven
o'clock it's not gonna start the one
hour countdown until 9:00 a.m. the next
day so this is gonna keep your tickets
organized for you you know if it comes
in on Sunday or something like that
you're not gonna be getting overdue
notifications tickets aren't gonna be
like crazy over to its gonna keep it all
organized within your business hours so
you're gonna know you're still gonna
know which ones need to be you know
responded to first it's gonna keep them
organized for you so this is great for
reporting things like that we recommend
you know you set up your business hours
to keep keep everything in order can
that can business hours be defined per
department not per SLA is the exclude
holidays related to any country so
business hours can only be defined per
SLA but you can create as many SaaS as
you want and you can have the SLA s
apply to specific departments only so if
you want business hours per department
you just need to create you know
one-hour SLA for department sales and we
can do one for department you know
technical as well so you can create as
many of these as you want and apply them
to the department and I'm going to show
you how to apply them now the holidays
basically you're just gonna put the
dates here this isn't any country
specific you're just gonna put like what
days you want to exclude so you're just
gonna put the Year day a month and date
right there so if you want like you know
Christmas this year let's say you want
Christmas off so we're just gonna do
like this 1225 so basically this day is
gonna be completely excluded and that's
it you're just gonna add them by one so
you know Christmas then if you were on
the day before Christmas off as well you
know Christmas Eve so now these two days
are excluded that's how the holidays
work okay so we can hit save
okay so now we got our first SLA level
set up now you have the level set but
now we actually need a rule to apply
these SLA levels so we have the SLA s
and now we need to apply them to the
department's so this is where the SLA
rules come in so you're gonna create the
levels first then the rule so we're
going to create SLA rule let's just do
sales department SLA and we're gonna add
a condition so we want these are very
very customizable let's just do a simple
rule here we want if a ticket is created
to get created and ticket department
let's to ticket Department is sales
we're going to change SLA level two
too late for sales department the one we
just set up so that's basically it so
ticket created anytime is in the sales
department it's gonna add this level
here and you know the sales department
the way the tickets get to the
department is by the email so if they
send the email to your sales email comes
into the sales department it's gonna
trigger this rule and it's going to add
that SLA for you you can also add a few
other accents here you know if you
wanted to like stop other rules
basically this will you know once it
adds SLA it will stop all your other
rules as well but no need to get into
that it's a little bit more advanced now
we can remove this so this is good
enough for now let's hit save so now any
ticket coming into our sales department
it's gonna get that one hour at sunlight
level now we can create as many rules as
we want as many SLA levels as we want
like I said earlier you know if you want
different SLA is different business
hours for different you know departments
just create more rules create more
levels and have them apply like that now
let's take it one step further we can
also automate our SLA levels using tags
as well I wanted to show you guys this
this is really useful as well so we have
the rule of an SLA set up now let's see
here if I can if I can get an example
ticket let's just pull up one of my
tickets and let me show you guys
actually so let's do let's see here
I had an example setup before but let's
see if this will work here okay so
actually this is not a this one's not
gonna work but I wanted to show you guys
if we have let's say a ticket comes in
to your sales department right and we
set up the one hour SLA for sales now
let's say you know this ticket you find
is actually it needs to be resolved
right away like I need to go to the top
of your list so right now that's at the
bottom of your ticket list you know it's
it just came in but let's say this is an
urgent ticket so we can actually use
rules combined with tags to escalate the
ticket to change the SLA and level so
let's go over that something similar to
that case so first of all we're gonna
create a tag now the purpose of tags is
to organize your tickets you can create
tags for you know whatever you want
basically you can add as many tags to
you want as a ticket they're good for
organizing searching and running reports
so let's create a tag for urgent and
let's say you know this is when it
ticket comes in it's really urgent let's
do let's do red I guess Martin is always
red okay
oh you
I already have an urgent egg so let's
just - urgent with the explanation point
okay so we got the urgent tag created
and you'll see it down here now we want
this tag when it's added to a ticket to
actually change the SLA level so first
we're gonna need actually an urgent SLA
level so let's create one here let's do
Virgin level and for urgent level we
want like five minutes this is you know
this is really urgent so let's hit save
and we're gonna do the rule and we're
gonna create a rule for let's call it
urgent level change and apply when we're
gonna do ticket tags changed and if tag
added is urgent if urgent tag is added
we're gonna change
SLA level and we're going to change it
to our urgent level here so this rule
you're gonna see here apply one ticket
tag changed if the ticket tagged urgent
is added change SLA level to urgent so
this is going to modify the SLA level
right away on the ticket so let's go to
our ticket now and let's see if I did it
correctly here it shouldn't if I add the
tag it should automatically you know
change the SLA level to urgent so let's
open this back up so we have our open
ticket here
okay so we got our open ticket here now
let's add our urgent tag
and actually it has changed SLA to
urgent level change but I'm sorry guys
the system language is in a different
language for some reason but we have the
urgent level change here so you can
actually see John Gordon added the tag
urgent and system changed SLA to urgent
level so urgent level change is applied
here you can actually click on the rule
here and actually see you know what rule
it is so every time I ruled sugars in
the system here you'll be able to see
that here and you can actually check
what the rule was so just see we added a
tag and it changed its urgent level now
that's just one example of how you can
actually you know add tags to do
different tasks for you
there's a lot of different automation
you can do with the tags and rules so
you know that's one example if you add
this tag is gonna change it to SLA
urgent but we can also do you know
something like if you add a tag to the
ticket it automatically transfers it to
this department if you add a tag like
VIP tag it automatically assigns it to
this agent so you're gonna see all of
those options here in the rules
basically let's go to back to our urgent
tag here whoops let's go down here we go
so you're gonna see here you know if
this tag is added changed SLA but we can
also do things like let's say it is a
new ticket if ticket tagged new is added
you can have it do transfer us to
transfer tickets and you can have it
transfer to a different department so
something like this you know it's going
to automate the tasks for you let me
find out I don't have a new department
but anyways you know what I mean so you
can have the different rules and the
tags automate the tasks for you it's
very useful
you know transferring assigning tickets
automatically you can do this with the
tags added okay now we've basically
covered the basics of the rules tags and
automation I want to go back to that
question from earlier actually Brad
asked how to get an email notification
when a customer response to a ticket now
that's a good question
we can do this with our rules so with
the rules you can also set up
notifications in the system so let's go
over this right now so if you want to
set up some notifications you're gonna
do it in the rules section here so
you're gonna do rules we're gonna create
a rule and let's do let's do the rule
customer replied take it okay now we're
going to do apply when so we're gonna do
ticket status changed so basically
whenever your ticket whenever you have
responded to a ticket of a customer
let's go back to this for example
go to this ticket here and it's an open
ticket right now we need to respond to
the customer so if I respond to the
customer right here let's say you know
type something up hit send to the client
okay now the ticket is answered status
right so we've responded to the customer
but we once whenever the tickets
whenever the customer replies to that
ticket we want to get notified so when
the customer replies back
it changes the ticket back to open so we
can do when ticket status changed and we
can do if new ticket status
ticket status is open and if let's do if
the old status was answered or resolved
and let's do it let's do for this one
let's do new status if new status is
open and it was answered or resolved
before now we can do send notification
you're going to see right here send
notification
we can do all agents of department we
can do agent assigned in the ticket all
logged in agents admins we have those
options there so let's do all the agents
of the department and we can do
notification type we have info
notification this is that green one that
shows up on the bottom of the screen
here we have a red one it's gonna be the
same thing it's gonna be in red module
dialogue is actually gonna be like a pop
up in the middle of live agent and then
we have browser notification which is if
you're using Google Chrome or you know
Safari it's gonna pop up like a
notification up at the top right here
and actually say what it is and we can
add our message here so we can say
customer replied to a ticket so this is
what's going to pop up in the screen so
we can set up that notification here now
if you wanted to be notified by email
you could do it instead of send
notification you could do send mail we
could actually do both let's say you
want both we can do send mail as well
and now this is going to send ellipses
to send mail choose which email you want
it to be sent from and now you can add
your personal email here so I could do
John Lord la does comm that's for me so
now anytime a ticket changes to open you
know a customer has replied it's gonna
send me an email personally to my email
you can have the subject embody here you
know like response and what the email
says you know customer why did I take it
and now you get this email notification
as well
and you've got some variables you can
add here as well so yeah so you can
customize this notification now we're
gonna hit save and this rule is gonna be
applied here okay so that is how you
would do it for notifications you can do
that for you know when a ticket is
replied to there's also a lot of other
notifications as well you could also do
it you know if a ticket becomes overdue
or if a ticket you know is transferred
to a certain Department you can have
that notification pop up as well so it's
up to you you can add you know any
others conditions they're not just when
a ticket is replied to so if you know a
ticket let me show you actually let's
say we want to rule like if a ticket
becomes overdue like you know your SLA
levels are one hour right so let's say
after an hour is up and no one has
responded to an email you want to get
notified or you want to notify your
agents right so you know that just
someone needs to answer that ticket now
we can actually do that with the time
rules so the regular rules are for
whatever actions are happening in ticket
right but we have time rules as well and
these are gonna be like basically if you
know time they're getting triggered by
time so you know if like a ticket hasn't
been responded to in an hour is overdue
by an hour or nothing has changed this
time rule is gonna execute so we can
create a time rule so let's go ahead and
do that let's do let's say we want to be
notified if the ticket becomes overdue
right so let's say ticket SLA breach
okay so let's do now we have a few
options here we have ticket is older
them so this is like you know ticket is
older than three days send a
notification ticket status change is
older than you know a couple days ticket
due in less than so this is if you want
to be notified ahead of time like you
want
you know five minutes till tickets do
get notification you can do that as well
but let's just do like if the ticket is
overdue let's say if it's overdue by one
minute now we want to be notified right
so we can add a condition group as well
you know if it's Monday Tuesday
Wednesday you can add that condition so
let's do we only want to be notified
during the week we we don't want that on
the weekend okay so now if a ticket is
overdue for one minute during the week
we want a notification so we have a
bunch of other options here you know you
could change ticket priority change SLA
level you could do anything you want but
let's just - let's do notification so
said notification to all the agents
logged in and let's do let's do browser
just in case they're you know on
Facebook or something else they're gonna
still be notified okay and let's do a
message here we have a ticket that is
just now overdue okay and we can also
apply to existing tickets so if you have
a bunch of overdue tickets and you hit
apply now they're gonna get notified of
all those tickets but let's leave this
unchecked so the song it happened for
future future use okay now we have it
saved so anytime a ticket goes overdue
by one minute that pop-up is gonna show
on their screen and they're gonna know a
ticket is overdue they can check their
list here go to all tickets and they'll
be able to see overdue tickets right
here the ticket list is automatically
sorted by SLA so you know it's in sort
of by importance by default so you can
see you know this one is twelve days
overdue okay seven hours I'll reduce
you're gonna see that right here
anyone that is you know open with time
remaining you'll be able to see them
right here so when an agent goes to
their list
the red ones at the top those are the
ones that are overdue
all right so we've covered the overdue
tickets now we had one more question
from Brad actually how do how do I get
rid of those forced tickets from Twitter
and where our tweets our auto answered
can we auto delete them yeah yeah you
can automatically delete them we reach
our auto answered you're going to need
to set up a rule for that so you can set
up rules to automatically delete tickets
as well so we're gonna just show you
we're gonna roaster and we can just do
let's do like Auto the lead tickets now
unless you're exactly how those tickets
get to you from Twitter but there's got
to be a way to delete them automatically
from here so we have some options here
let's do like ticket is created and this
is I'm guessing I'm proud I'm guessing
these are like forged tickets from
Twitter or tweets or audits lead I'm
guessing they're emails from Twitter
right so let's do if so we're gonna do
when ticket created from email whatever
Twitter emails us
us to email from equals whatever
Twitter's email is I'm going to guess
like support at twitter.com so let's say
we getting is emails from Twitter and we
just don't want them we wanted to leak
them so let's do email from equals
Twitter okay we so we know we're getting
these emails for Twitter and but we want
to keep you know some emails from
Twitter we only want to delete the ones
where the body contains something like
auto answered okay so you know this is
coming from Twitter and they're
automatically answering your your your
tweets we don't want these notifications
which one delete them so email is from
Twitter and the body contains auto
answered let's just delete this ticket
okay so now it's going to delete it and
we can even write a note here that's
gonna say why is deleted so you can just
say tweet was no answer
boom so now it's just gonna delete that
ticket now it's gonna automatically
delete that ticket and yeah it's gonna
be gone so the rule will automatically
take care of that hold on a second
requested by is the twitter name it's
not an email source huh one day yeah you
know what I'm that's quite sure then you
know Brad let me follow up with you
after the webinar and check it out
because seems a bit specific i'ma have
to look into it but there's probably
some way to do it with the rules it's
very customizable so you know maybe if
ticket created and the ended source is
Twitter and it contains the something
like that we can set up a rule so yeah
let me let me reach out to you after
this will gets down to it but um
basically it's gonna be something with
the rules - you know Auto delete its
receptor it is okay cool
so another question we got here can I
use the same email for different la
accounts registration support email
across different la accounts um well
yeah you could do that but I don't see
why you would want to basically
agent is meant to handle you know all
green O's in one place so I think would
be better to do it in one account but
yeah you can connect the emails at
different accounts that's not a problem
it's gonna basically create a copy of
the emails on this on the live agent
accounts so there'll be a copy on both
accounts but I would recommend using
just one live Asian account okay another
question here
this is great hope there will be a
replay lot to take in yes Susan there's
gonna be a replay I'm gonna send it out
to everyone who attended as well don't
worry I'm gonna upload it to YouTube
yeah it is kind of a lot to take in I
wanted to cram it all into this one hour
you know just kind of go over the basics
of this Soleil and things like that but
yeah I'm gonna send up a replay of this
one okay we have another question what
is forwarding emails and others yeah
that's a good question let me show you
this one and sorry this was a question
from like the beginning of webinar but
let's go over that
so mr. Cohill is asking when we're
adding the email accounts here where
there's an option to basically if you
don't see your account here you can do
other and there's an option for
forwarding and what this means is you
haven't when you sign up for live agent
you get a built in email this is done by
us you're gonna see here support at mail
demo account on LI desk this is my demo
account or whatever your account is
you're gonna get your own email as well
and forwarding means basically if you
have like you know a Qi mail account all
emails sent to that gmail are gonna be
forwarded to this email and they're
gonna when you reply it's gonna look
like your Gmail but you're using our
email server so we actually don't
recommend doing this so I would I would
highly recommend not using the
forwarding options so when you're
connecting I would not recommend
forwarding I would recommend using this
which is a direct connection
basically because forwarding you know we
have tons of people signing up for free
trials and a lot of times our email
server gets marked as spam so they might
go straight to the spam folder so i
would recommend connecting it directly
don't use forwarding if you can
okay
questions for now guys I think covered
everything I wanted to go over here
forwarding is required if you're one of
the many Google Apps users Google Apps
uses really
yeah domain alias solution yeah you can
use an alias as well so yeah that's a
good point yeah there's nothing wrong
with using forwarding it's just a my go
to spam so we don't recommend it can I
use the same G suite email across
accounts then
I talk about for multiple accounts right
yeah yeah you can there's no problem but
like I said I recommend using all in one
one live agent account we use WHMCS for
tickets can I get tickets created on my
WHMCS um I'm not too sure about that I
know WHMCS is like an online payment
processor store right
I'm not sure how you'll get tickets
created there
does basically because you know it uses
live agent is using email for tickets so
if you want to forward out a ticket from
live agent you can do that as well
you know there's option here basically
when a ticket is created here you can
forward it out as well so let's go to
the top here let me show you so for
example this email right here I can
forward it to any address at once so if
you want to forward it to your WHMCS
email you can do that so forward you
know it's gonna forward the email out
and you can also set up rules to
automatically forward as well so there's
an option in the rules section basically
when a ticket is created
you can have the option to forward the
ticket so this is actually pretty useful
as well sometimes a lot of customers
want like to forward out tickets created
to you know a certain person maybe like
some sort of admin in their company or
some sort of manager in the company so
you could do that as well so anytime a
ticket created from email just do like
this
you're gonna see the option for forward
email too and just put the email right
here so this is gonna forward all the
emails created to a specific person
all right the app is way more
complicated than I expected not
necessarily an issue if there's a robust
tutorial support you mentioned YouTube
are there tutorial videos there yes
definitely
it is very very robust software we
definitely take pride in that
you know we've created it to be the
complete helpdesk solution so yes it is
very complicated with the rules and
things like that but which automated to
make it as user-friendly as possible but
if you need help like setting up a
certain thing you know we do have 24/7
chat support available at live agent
comm we also have phone support you can
give us a call as well and yes we do
have a YouTube channel with a lot of
videos on there and we're gonna be
uploading these webinars as well to the
YouTube channel so you can review them
share them with your colleagues things
like that you guys had a full screen
feature in video calls uh or screen
share and video calls I believe they're
working on the screen share but no
estimated time on that full screen I'm
honestly not sure about full screen in
video cause I thought it was there
actually to be honest but not quite sure
about that I'll have to check that out
and get back to you
okay we have about 500 minutes so let me
go over a few more questions can I use
live agent for just different business
sites I have that are basically
different types of business
I would not want one - no of the other
yes you can do that Susan and the way to
do that is with departments basically as
I described earlier so every time you're
applying to a different client from a
different business and you're applying
from that business department it's going
to use that email template so it's going
to look like a completely different
business on the other one
okay how can it send a message if a
client hasn't replied for three days
then Auto closed if there's still any
reply from the client after four days
that's a really good question let's do
that one I think that would be like the
last question I can go over here and
that's actually a great example and very
useful as well
so let's just go ahead and set that up
let's say you won if the client hasn't
replied for three days we want to send
them an email automatically so let's
just do that we're gonna set up a time
rule okay and let's name it no response
three days from client all right so
ticket status change is older than three
days so nobody has touched the chicken
for three days right
let's do perform action and we're gonna
do send answer so this is going to send
an answer in the ticket and of course
we've got the options for how you want
the answer to look and we can do the
message so that's just a deer or let's
just do hi let's keep it simple
we have no reply from you are you okay
just like that and it's gonna send this
automatic back to the client after three
days if nobody has touched it just like
that
no lipstick save so now it's gonna send
it to him after three days and you said
you know after four days we want this to
close out the ticket so we'll get that
another time rule and we're going to
apply it when ticket status change older
then four days and also we want if
ticket status is answered we don't want
it for open tickets you know like we
don't want to send it for that so only
for answered or yes only for I'm sorry
Oh answer tickets yeah only if it's an
answer ticket we don't want it for new
or you know open anything else so if
there's a ticket that's been answered
for longer than four days let's just
automatically resolve it so I'm gonna to
go down here resolved ticket I'll
automatically resolve we can even add a
note here like no response for days so
we haven't got anything for four days
hit save
oh we need that title here auto there's
all four days so just like that after
four days no response it's gonna
automatically close out that ticket for
you
fantastic system Thank You Susan we
believe so as well so uh yeah guys so I
think we covered it all today that was
mainly what I wanted to go over you know
how to get the emails set up how to get
your SLA set up you know in a business a
couple basic automation tasks you can do
so I hope you guys you know can apply
these to your account make life easier
for you keep everything organized and
yeah keep your automations on points so
guys thank you for joining me we're
gonna be doing some more webinars as
well in the future next week you know
we're not gonna have any more this week
because Thanksgiving things like that so
yeah I'm gonna send you guys an invite
to the next webinar next week we're
gonna be going over chat things like
that so guys thanks again for joining me
have a nice Thanksgiving coming up and
take care guys thanks again
Gordon John yeah it's a it's John Gordon
it's a it's a double first name but
don't worry I get that a lot Nick all
right so thanks guys I'm going to end it
down Cheers
Unlocking the Power of LiveAgent
LiveAgent is a comprehensive customer support solution that can help businesses manage customer inquiries more efficiently. To make the most of its potential, it’s critical to understand all the software’s features and functions. LiveAgent webinars provide an opportunity to dive deeper into these features and functions in a structured and interactive environment. New users can learn how to use the software’s features, shortcuts, and most significant capabilities, while experienced users can learn the latest tactics, strategies, and product updates.

Introducing LiveAgent’s new AI-powered feature in the works
LiveAgent is a customer support software with AI-powered features, including email ticketing reply templates based on knowledge base articles. It improves response times, accuracy, and personalization, while helping to cut costs and enhance the customer experience.
LiveAgent Webinar 4: Multi Knowledgebase
The LiveAgent Multi-Knowledge Base feature allows businesses to manage multiple knowledge bases from one account, each for an additional $19 a month. There is no limit to the number of knowledge bases that can be added, and the feature is especially useful for businesses managing multiple brands or businesses under one support system. The feature also allows for SSL certification for added security.

Our website uses cookies. By continuing we assume your permission to deploy cookies as detailed in our privacy and cookies policy.